Milestone 2022
Get Started
Milestone is our campus camera system that is governed by UPD and the Finance & Operations Policy FO-62 Video Surveillance policy.
Learn
If you would like access to certain campus cameras, you will need to place a request in Katalyst. Once you have access to any cameras on this system, this set of tutorials will show you how to set up Milestone to view your areas.
-
Opening Milestone
When you have access to Milestone, you will need to know where to go to access the program. All you have to do is follow these steps:
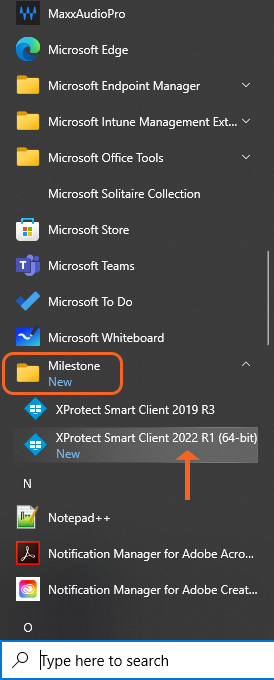
- Go to the Start Menu
- Select Milestone
- Select XProtect Smart Client 2022 R1 (64-bit)
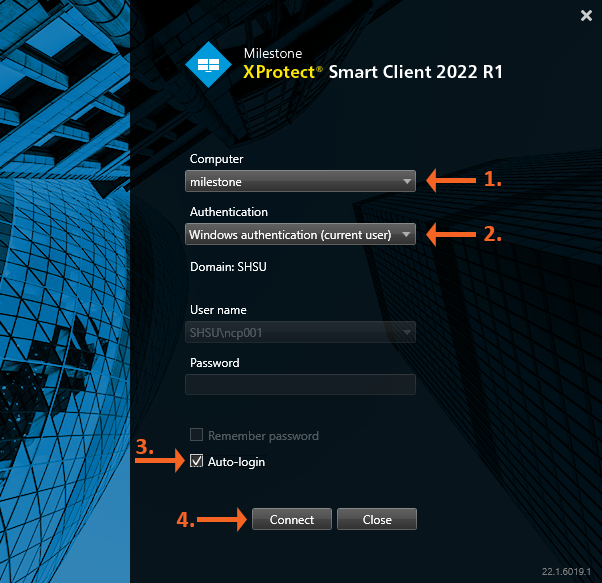
If not already populated,
- Be sure to enter milestone as the computer.
- Authentication should be set to Windows authentication (Current User).
- Check the Auto-Login box if you wish to bypass the login screen in the future.
- Click Connect.
-
Milestone Overview
Milestone Overview
Milestone has two tabs:
- Live
- Playback

Live Tab
The live tab is where you will view your cameras in real time. When you first get access to Milestone, this tab will have nothing on it. The Live tab offers you numerous features, including audio, carousels, hotspots, Matrix, camera shortcut menus, pan-tilt-zoom control, digital zoom, events activation, output activation, quick playback, and more. You will need to use the Setup Tab to activate the features of this tab.
Playback Tab
The Playback Tab is where you would go if you wanted to view past events that your camera may have picked up. The cameras will only record if they pick up movement. You will need to go to the Setup before you can use this tab.
-
Setting Up Your View
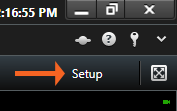
When you get access to a particular set of cameras on campus, you will need to first set up your view. To do this, select Setup in the right side of the screen.
The first section on the left hand side is called the Views section. It has a list of the areas you have access to and a Private folder.
- Select the Private
- Select the Create New Group
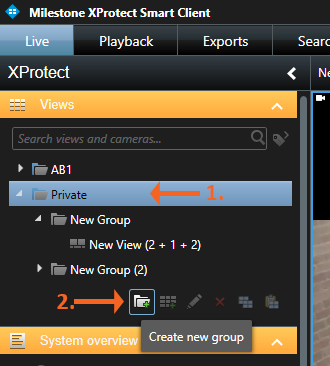
Once you do this, new options become available. You can:
- Create a New View
- Rename the Folder
- Delete the Folder
Click the Create New View button.
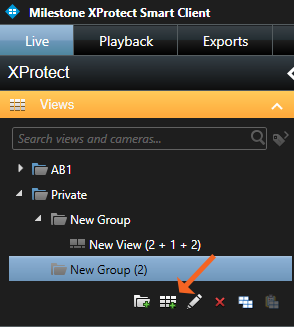
You will now need to choose the layout for your cameras. You have the option of using the following aspect ratios:
- 4:3
- 4:3 Portrait
- 16:9
- 16:9 Portrait
If you have a square computer monitor, the 4:3 ratio will work best. If your monitor is more rectangular, the 16:9 ratio is for you.
Select the layout that works best for you. In this example, we will select a 16:9 aspect ratio with a 2+1+2 view.
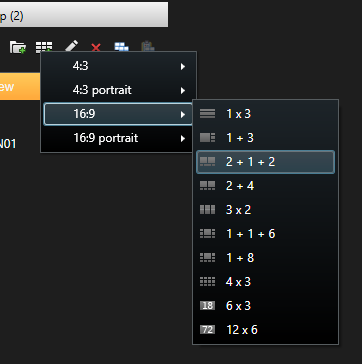
Once you select the view you want you will see placeholders in the larger area of the screen (as seen below).
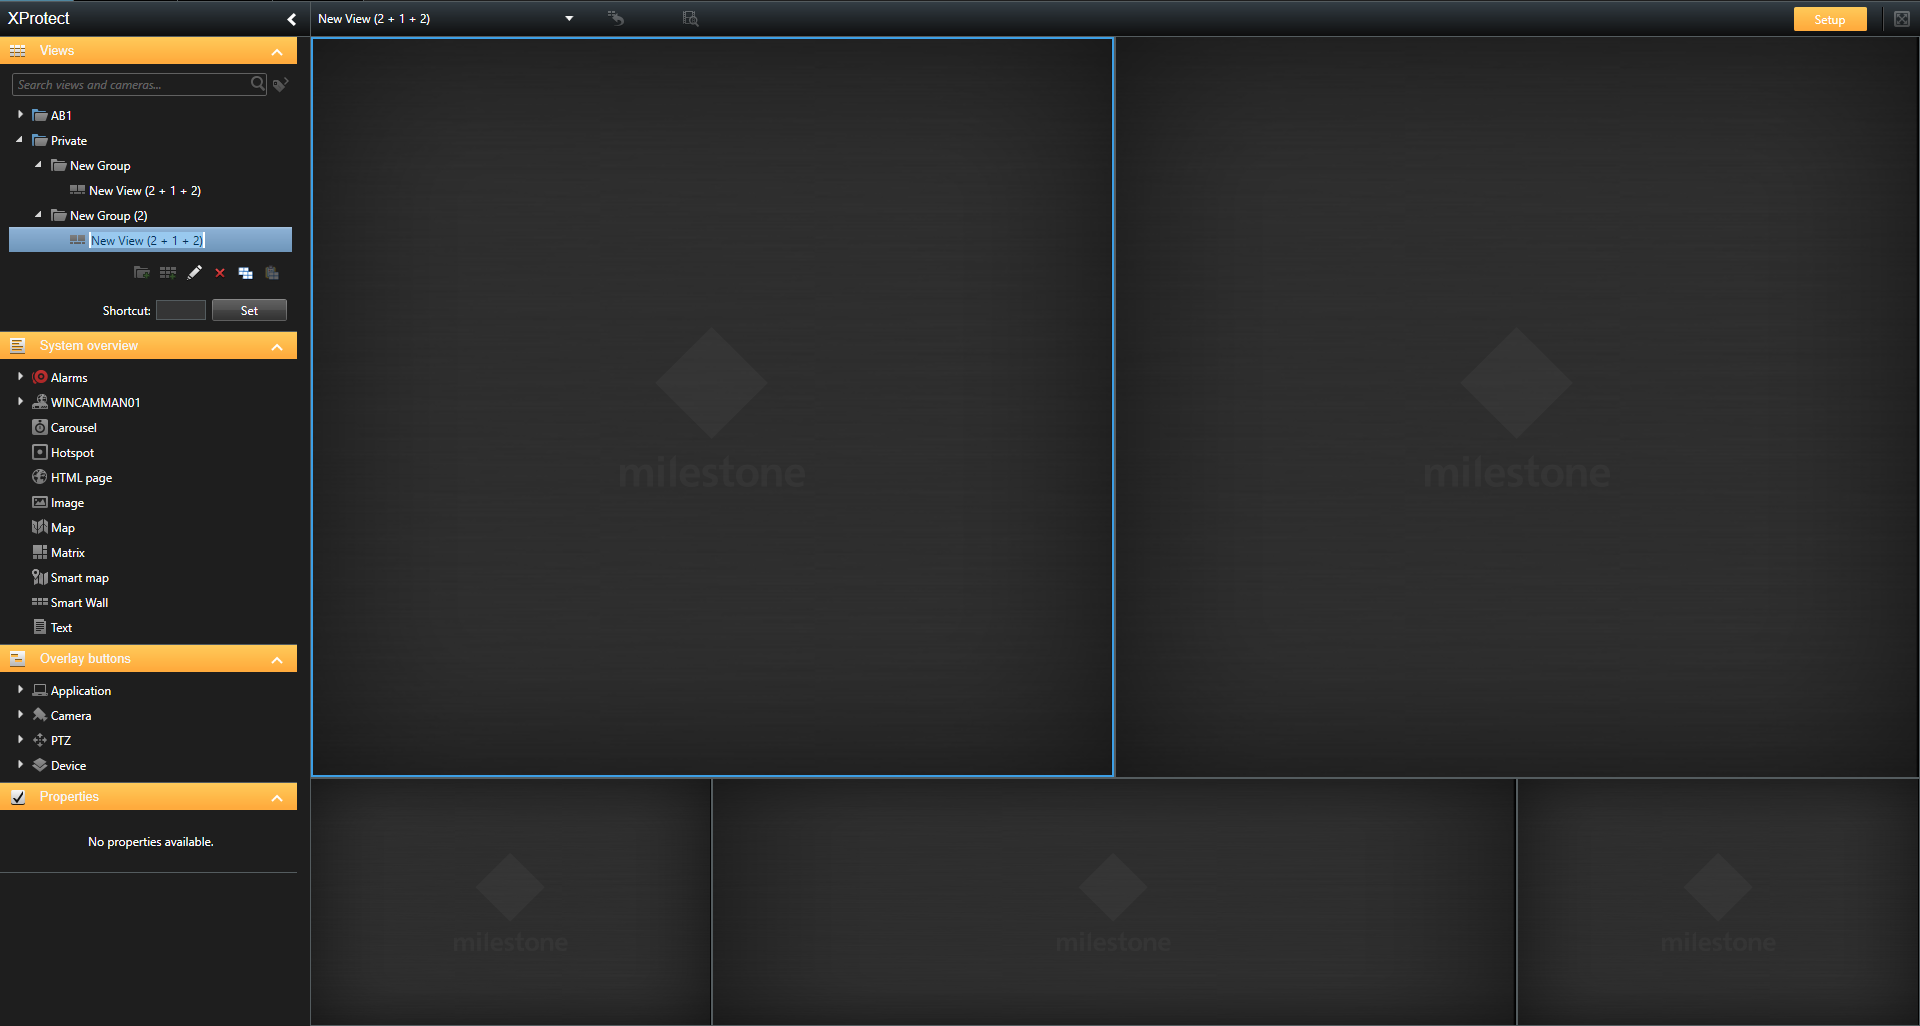
Now you can drag and drop cameras onto your screen:
- Go to the System Overview section underneath the Views
- Select the WINCAMMAN01
- Find the area/building folder (AB1 in our example).
- Drag and drop the first camera to the first placeholder.
- Drag and drop the second camera to the second placeholder.
Once you do this, you are all set up!
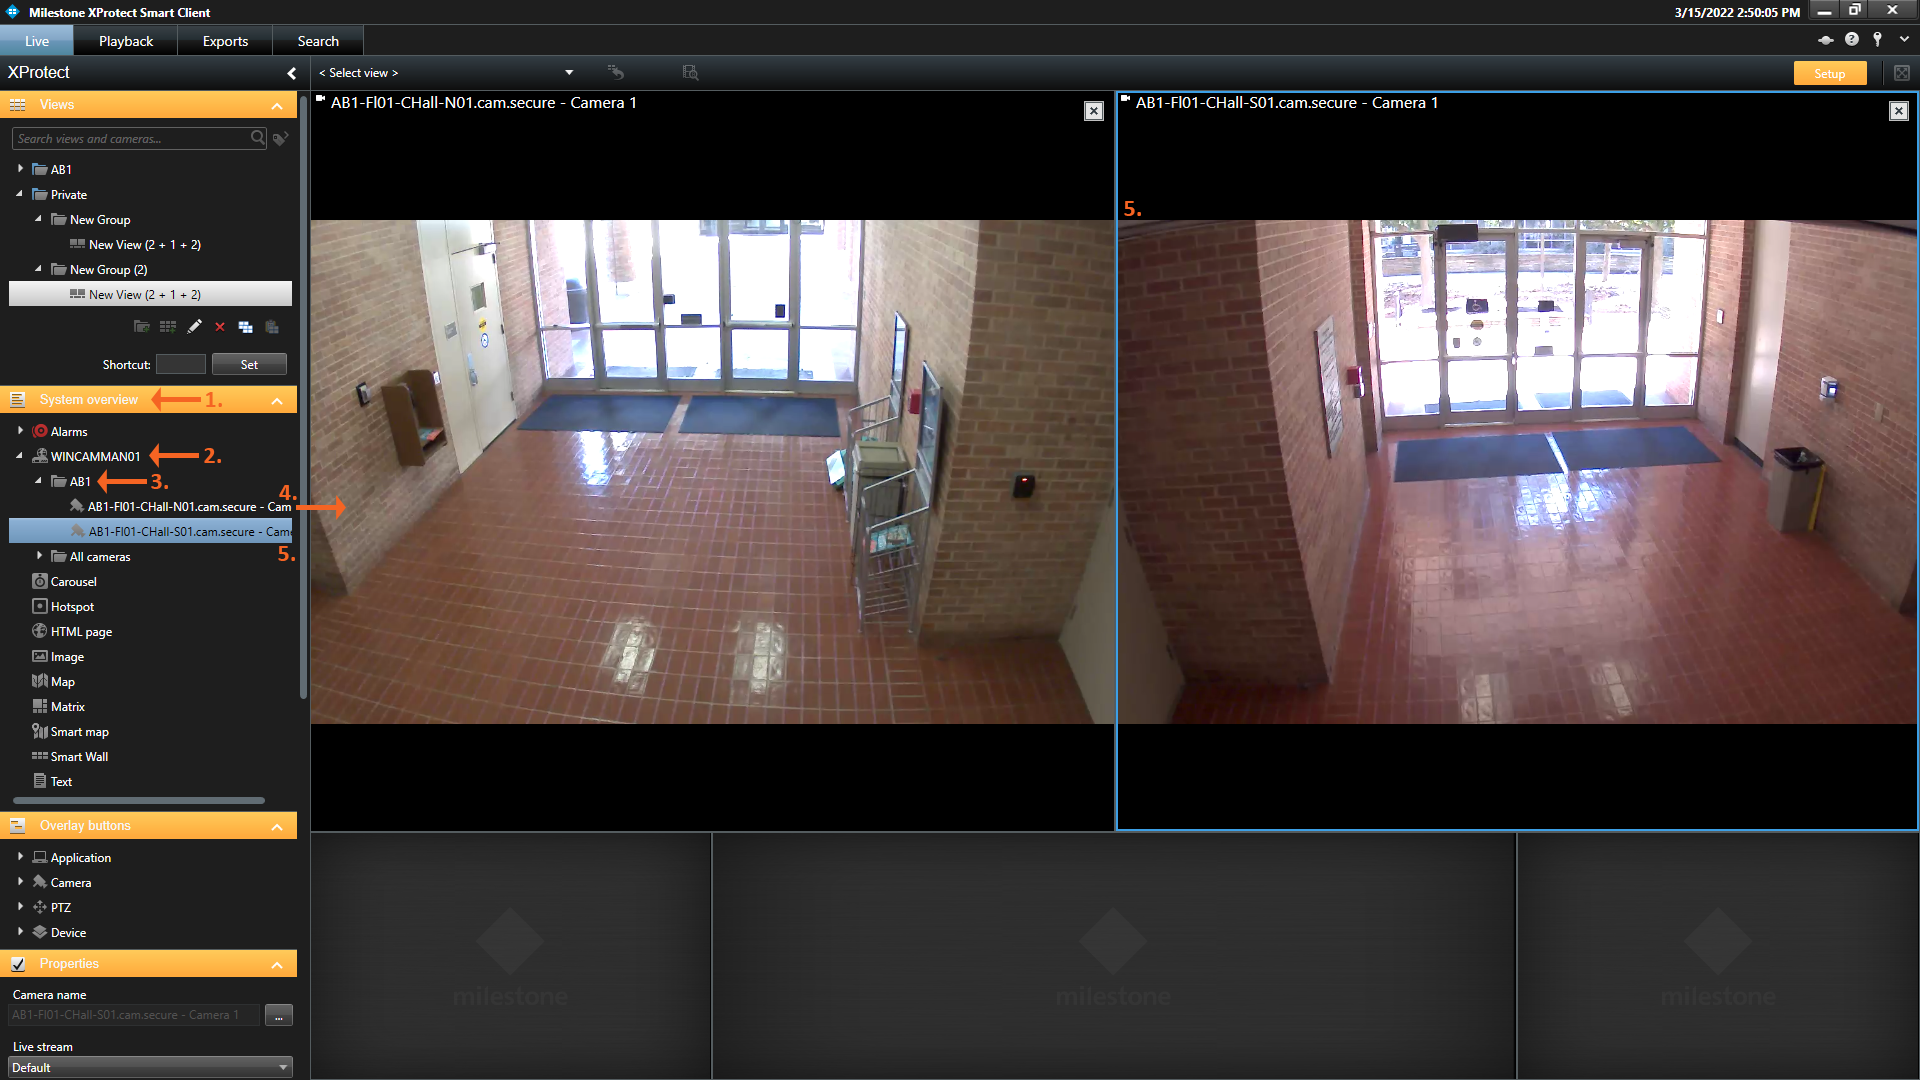
You can now de-select the Setup option to see what is happening Live on your cameras.
-
Viewing your Cameras Live
After you have setup your view you can watch the cameras in live action by going to the Live Tab and selecting the view you created in the Setup Tab. Once you select your setup, the main area of the screen will change to show your camera setup.
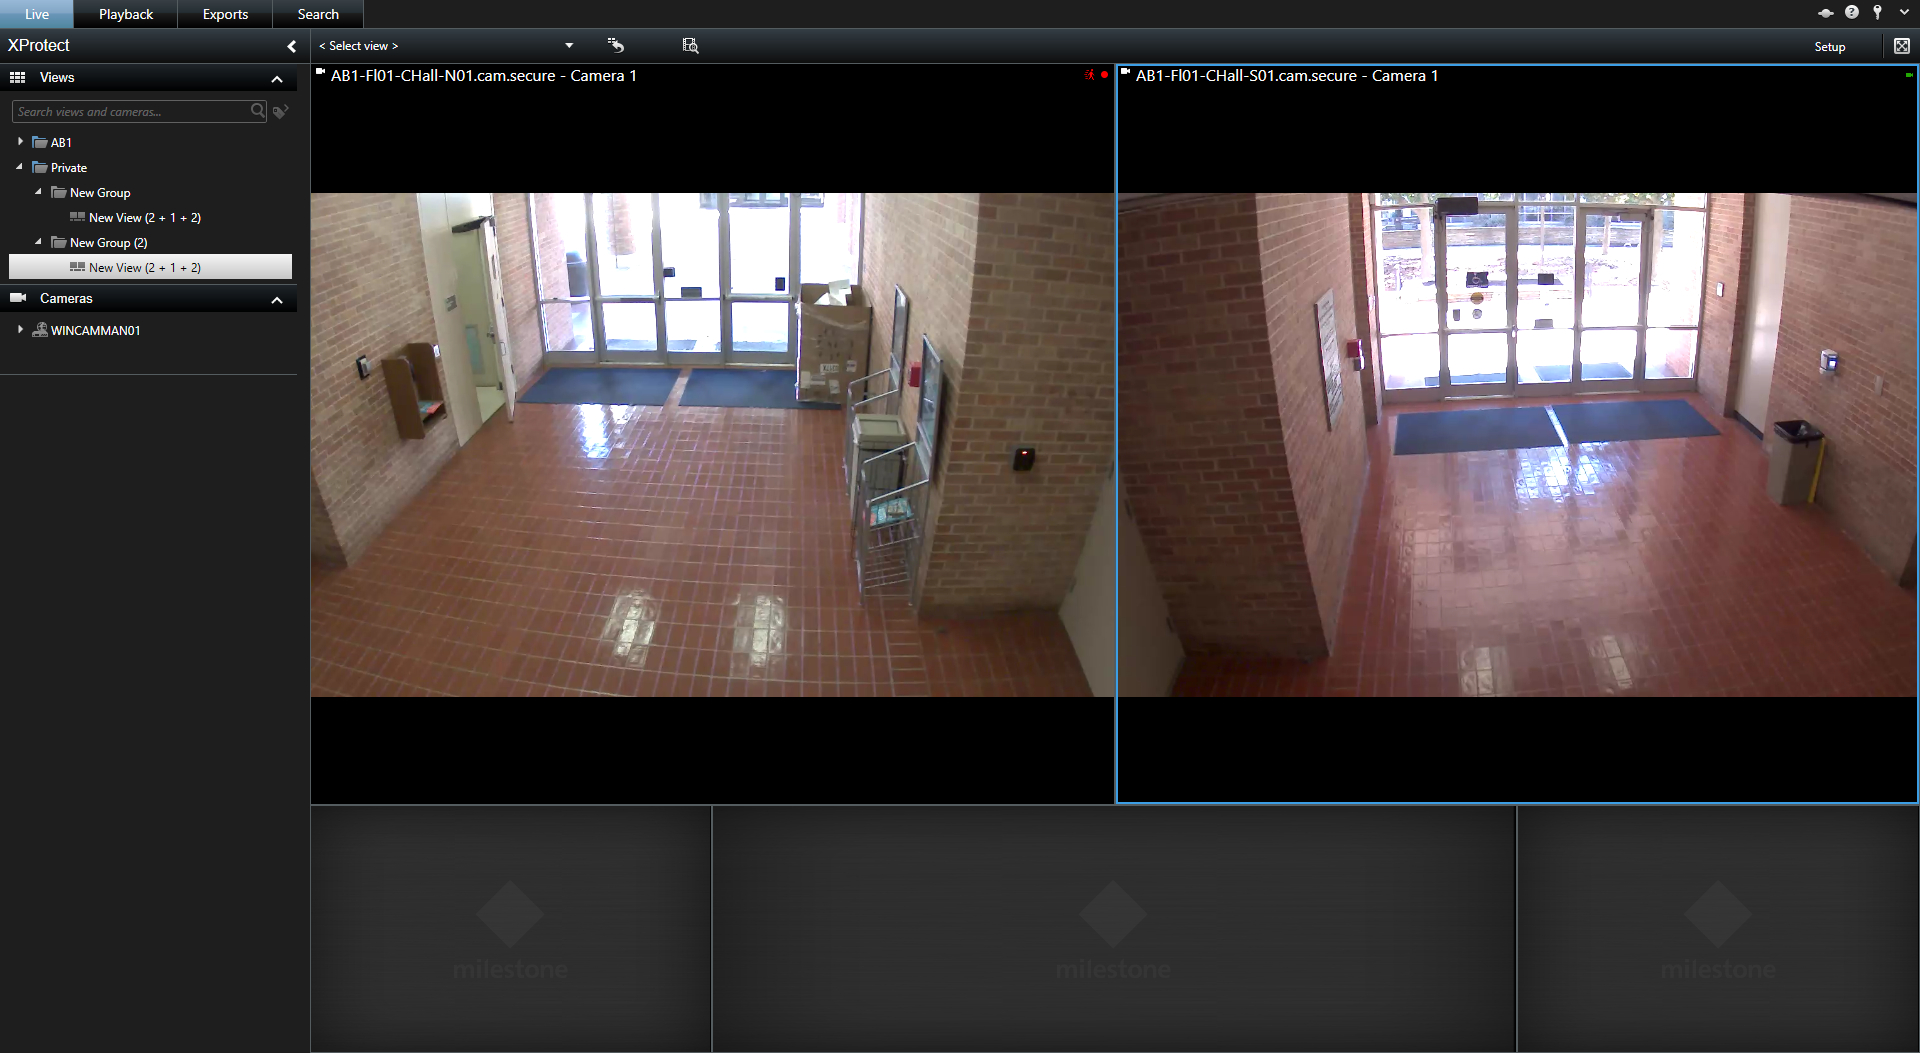
If you would like to have one camera take up the whole screen, double click on the camera area. To go back to your original view, double click the camera area again.
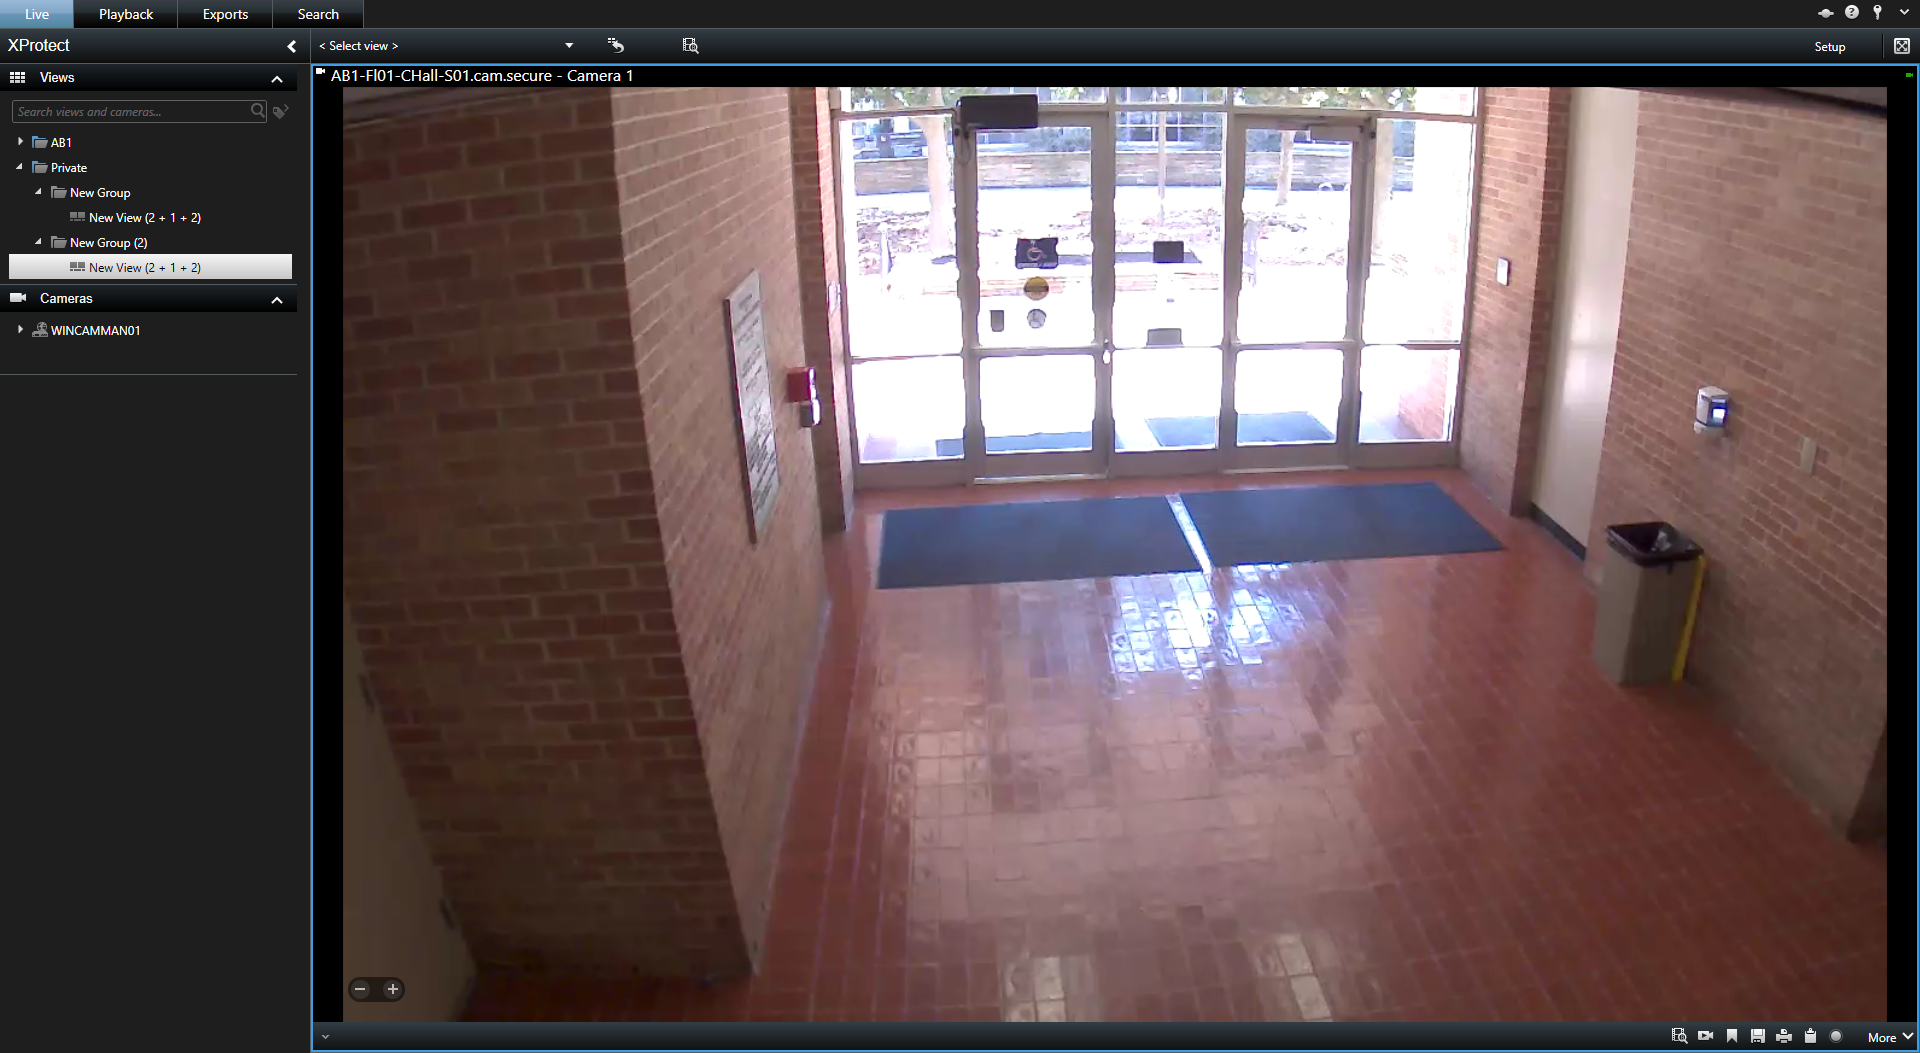
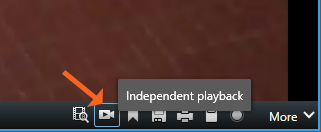
If you wish to view events that your camera may have recorded:
- Hover over the camera area
- Click the Independent Playback button
You can drag the slider back and forth to fast forward and rewind. Keep in mind that you cannot fast forward past the present time.

-
Exporting Recordings
To export a recording, you must be on an approved list with the University Police Department. If you are unsure if you are on the approved list or would like to be approved to export recordings, please contact UPD at 936-294-1800.
Once you are approved, if you would like to export and save a recording, follow these steps:
- Select the Playback Tab
- Select Export on the right hand side of screen and select Export
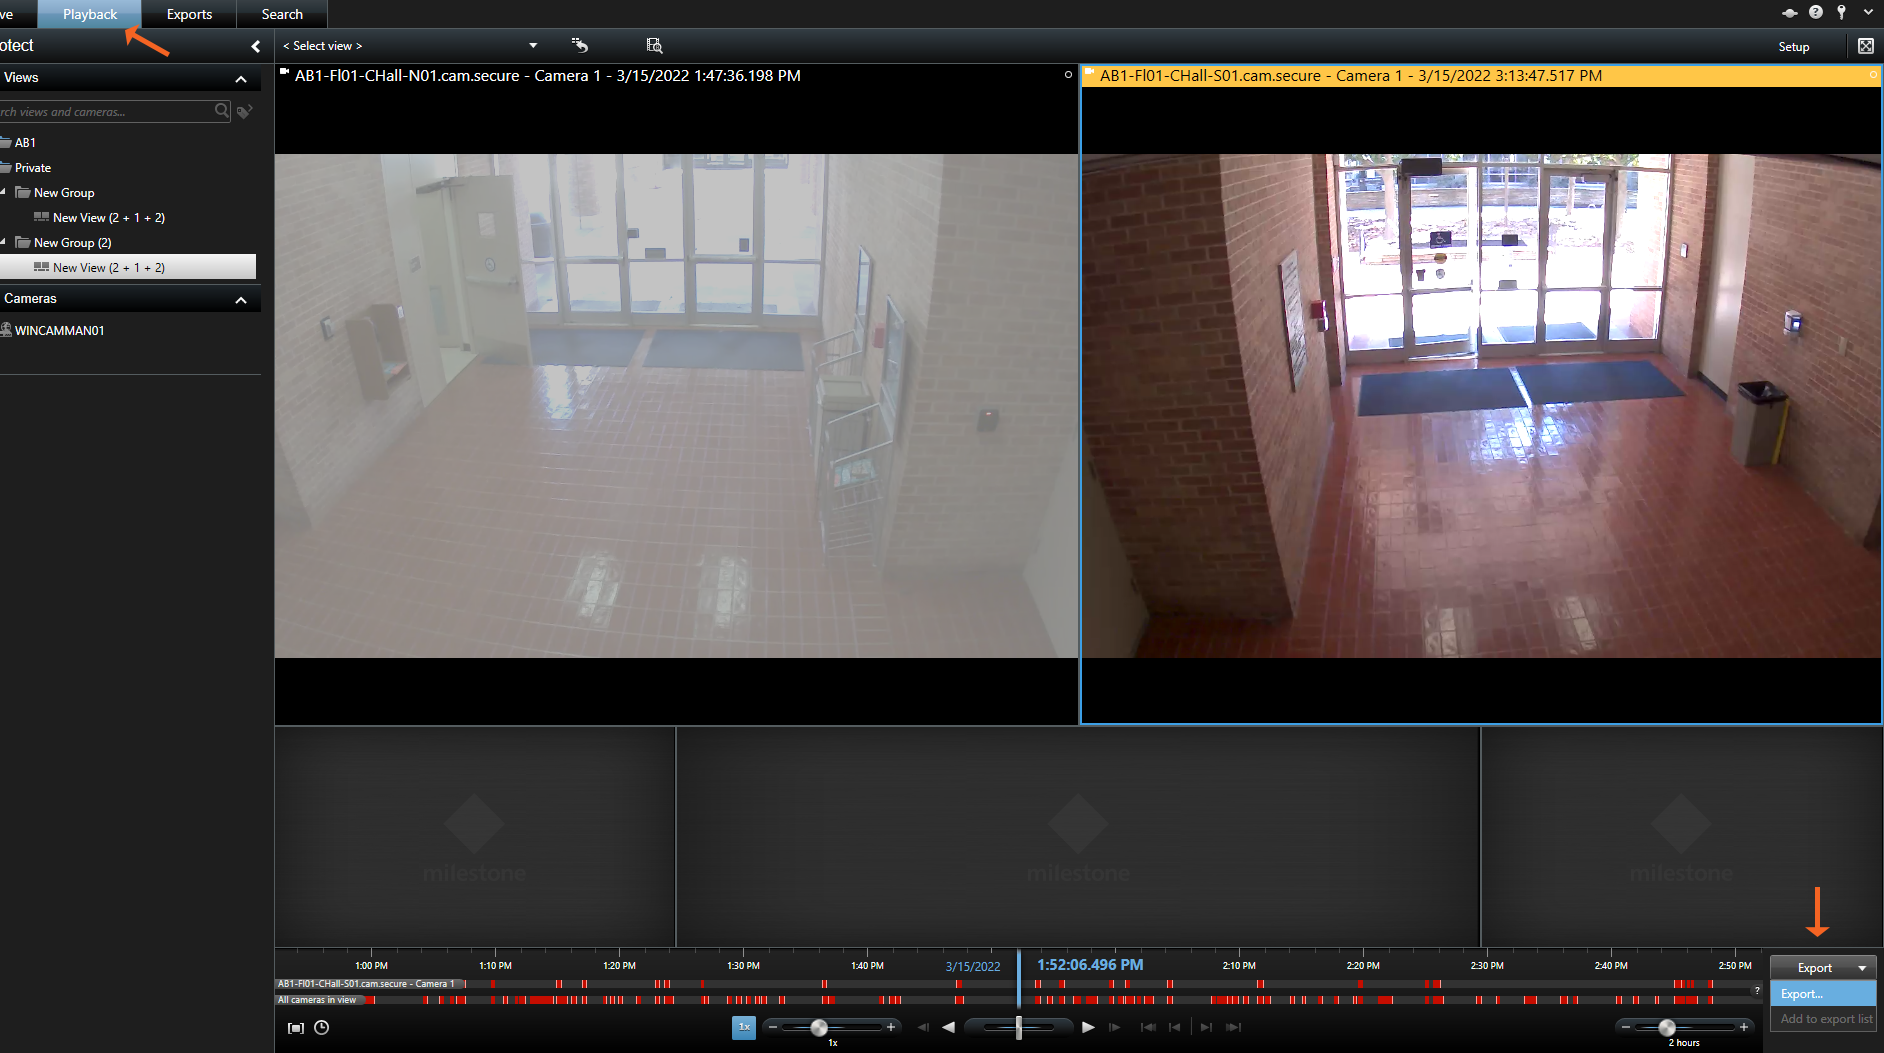
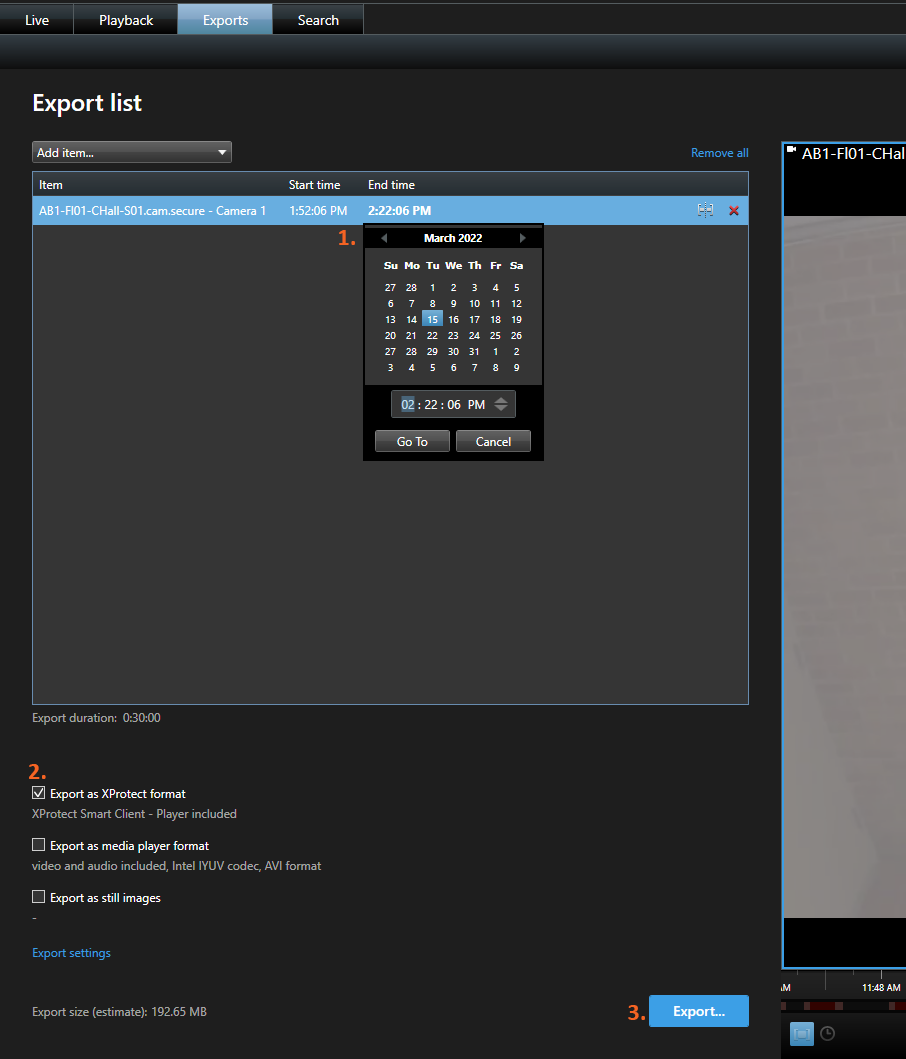
An Export list dialogue box appears with the export options.
- Double click on the camera listed in the Item area to adjust the Start and End date and times, the camera must be added in the Add Item section using the Add Item dropdown menu. Once a camera is selected, dates and times can be adjusted as needed. Please keep in mind, the longer the recording, the bigger the file size and the longer the export will take.
- Export format is the format for the export file. It is recommended to leave the selection as Xprotect format which will allow you to view the recording in the Xprotect software.
- Select Export.
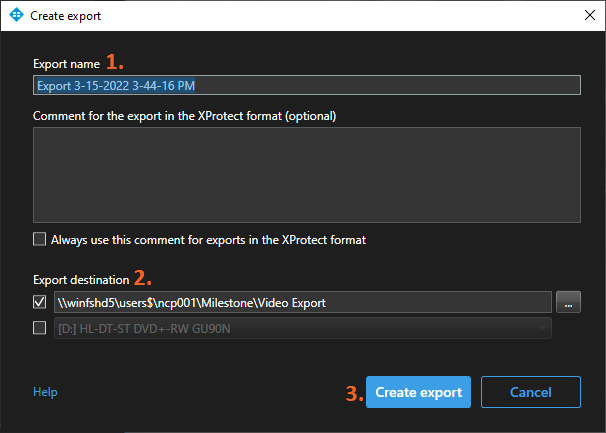
The Create export dialogue box will display.
- The Export name is the file name for the export.
- Export Destination is where the export file should be saved. It is defaulted to save to a Milestone folder on your S:Drive. If the export is large, it can take up a large amount of space on your S:Drive. If you wish to change the location to save the file, select the button with the "..." and choose a new file location.
- Select Create export to begin the export.
Keep in mind that the cameras will only record if there is motion detected. If motion was detected, the export will begin and see a file is being exported in the upper right corner of the screen.
As the file is being downloaded, it will show Exporting.

Once the file is downloaded, it will show Completed and the details can be seen in the Details, including the location of the file. To view the recording, locate the XProtect File in the file location provided and double click the file. The recording will open up in XProtect.


If there was not any movement during the specified timeframe, there will not be a recording to export, the recording will indicate failed in the upper right corner. The details of why the export failed can be viewed by selecting Details.

-
Centralized Search
One of the main features is Centralized Search – a new search platform in XProtect Smart Client, making it possible for users to search for everything in one place. Previously, users performed several standalone searches, depending on what data they were searching for. With the new Search tool, users can search for motion, alarms, events, bookmarks and other types of data, in one single place. This will enable rapid and efficient video investigations.
The new Search platform also embeds partner integrations via dedicated filtering options. Through specific plug-ins and devices, search criteria such as line-crossing and object-in-field will be enabled directly in the Search Tab, saving time and increasing efficiency.
-
Adaptive Streaming
Adaptive Streaming reduces the live stream resolution of the Smart Client. This allows the Smart Client to choose the live video stream with the most appropriate resolution out of a variety of streams with different resolutions. Additionally, the amount of data transferred to and handled by the Smart Client is reduced, which increases its performance.
To make sure that Adaptive streaming is configured in a view:
- Click Setup to configure the view.
- In Properties, click the Live Stream dropdown list, and the list of available live video streams appears.
- Check if two or more live video streams are available and select Adaptive streaming. Note: If only one live video stream is available, add more live video streams for the camera in XProtect Management Client.
- Click Setup to close the view configuration.
To make sure that Adaptive streaming is selected in a Live view item:
- Click the More dropdown list.
- Select Live Stream, and the list of available live video streams appears.
- Check if two or more live video streams are available and select Adaptive streaming.


